The Parishioner’s Module is one of the most useful resources available for church members and staff. And the best part is, there’s no additional cost! It’s already included in your subscription to IconCMO. If you aren’t familiar with the parishioner’s module, it’s a secure self-service login where members can view their own contact information, contribution history, and access a church directory. It’s even mobile-friendly so members can sign in using their smart phone or tablet!

Step 1: Set up your customized login page
We just released an exciting new feature that allows church staff and volunteers to log in via a customized login page. Click here for more information and instructions.

Step 2: Assign security permissions
As households are added in IconCMO, they are automatically assigned a user name in the parishioner’s security window. But the church controls the type of access members are given.
- No-Access is initially assigned to all households entered into IconCMO. So by default, households do not have access to the parishioner’s module.
- Read-only access allows members to login and view their information. If anything is incorrect, members can email changes to the church office directly from the parishioner’s module.
- Read-write access allows members to view and make changes to their own contact information. (For obvious reasons, members cannot make changes to their giving history or other members’ information in the church directory. They would need to notify the church office of any errors.)
Step 3: Give it a try
If you’re interested in taking the parishioner’s module for a test drive, follow these steps.
- If you’re not already, set yourself up as a household in your church’s database (you can delete it later.)
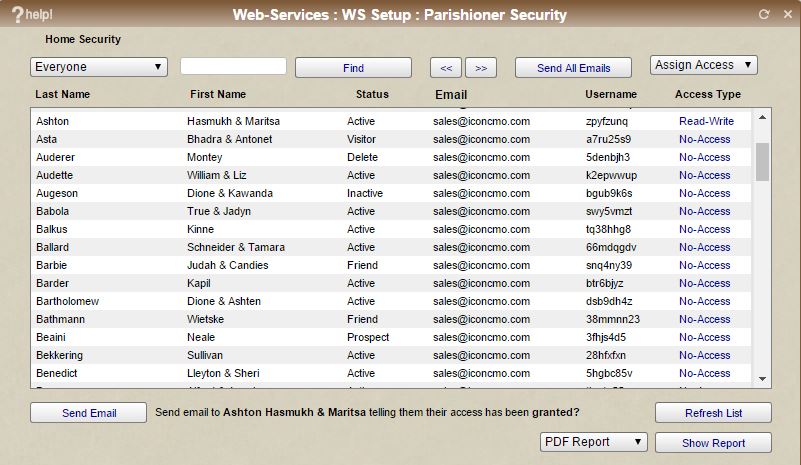
- Go to Web-Services: WS Setup: Parishioner Security.
- Search for your last name and click on the blue No-Access under Access Type.
- Change your security to the Read-Only or Read-Write.
- After you change the access type, you will notice a message at the bottom of the box that reads, “Send email to “your name” telling them their access has been granted?” Click Send Email.
- When you log in, make sure you are using the new user name that was emailed to you, not your staff login.
- You will be prompted to change this. Note: Make sure you use a different user id and password than your staff login for IconCMO.

Step 4: Generate reports
Don’t worry, if you give members read-write access so they have the ability to change their personal information, you will always be kept up-to-date by running these reports in the People – Households – Hse-Reports window.
Parishioner Changes – Provides the church with the member’s name, information that was changed and the date it was changed.
Parishioner Last Log in – Provides the names of households who have accessed their information.